Techniques & Tools Whose Time Has Returned
 Vashon Island Imaging lounge © Pam Swanson 2007
The studio on Vashon Island is itself is example of 'back to the future'.
Compare this 2007 view of our lounge with the 2010 picture I just made (below).
The lounge has morphed into a teaching workshop.
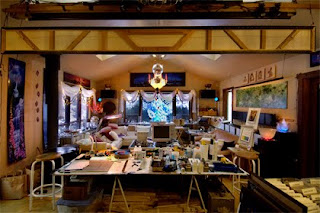 Vashon Island Imaging lounge in 2010.
Eventually I outgrow everywhere I live, one way or another.
As the hallways get narrower, I know that migration time is near.
Sometimes even I wonder why I keep some of the stuff. The old Epson® 2200's we have at Vashon Island Imaging (www.vashonislandimaging.com) are a good case in point. They were workhorses for years but not recently as times (and inks) change... to say nothing of the cost of ink in those small 12 ml cartridges compared to the large 350 and 700 ml cartridges on today's big Epson® giclee printing machines.
My left brain said dump those old 2200's, they are just taking up space and cost too much to run. But my right brain didn't make the same connection. That's probably because nearly every time I have dumped anything major that decision has come back to bite me. Here's just one example...
In 1980 my picture library contained well over a million slides. When I closed the New York studio and moved to Hawaii they were all put in storage. Ten years later I brought them all to Sweden realizing that I was going to be in Stockholm for a while and that the slides were rotting in the hot and humid Hawaiian atmosphere.
1,000,000 anything takes up some space. In this case, the slide library filled the better part of a 20-foot cargo container. Not having that much space available for an archive in Stockholm the library was ruthlessly edited to 25% of its former size. 75% was tossed.
As I said, a million of anything is a lot. Going through that many slides was a daunting task. However it was less painful than you might imagine because the library was about 50% stuff we had shot for Burger King® and Clairol® shows.
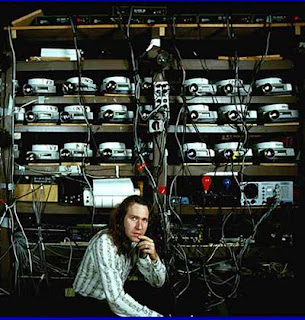
Burger King® extravaganzas whipped teen-age burger flippers into a frenzy at pep-show rallies around the USA. My company was called The Incredible Slidemakers back then. The crew and I would troop a 15-projector rig that we would run using an AVL® Show Pro V slide controller to project onto a giant screen. Our projections were the 'backdrop' at events for 1000 or more screaming teeny-bopper Burger King® workers.
Clairol® extravaganzas were attention grabbers at hair and beauty shows. The shows were fast paced and used multiple screens. We called them 'mindblowers'. The content was sprinkled with candid shots of audience members shot earlier or gathered from archives.
Vanity Fair
People watch shows more carefully if there's a chance of seeing themselves or friends. It's a great way to boost audience motivation as well as interest. Anyway...
The picture library became over stuffed with thousands and thousands of pictures of pimple faced kids either flipping burgers or posing as models at local beauty shows. Although some of those pictures once propelled their subjects and colleagues out of their seats with yelps and cheers they were totally useless anymore. Thus in one fell swoop I lightened the load 50% by committing those slides to the custody of the Stockholm town dump.
One snowy night a year later the phone rang in my Stockholm studio and when I lifted the receiver it was Ken Perry calling from Singapore. Ken was Marketing Director for Clairol® when we produced some of the aforementioned shows. But that was nearly a decade ago.
Ken told me how hard it had been to track me down. I admitted that I was amazed that he actually had been able to because I had lived in Hawaii, Australia, California, Vancouver and Stockholm since last seeing Ken in New York City.
He told me he was working on a giant anniversary spectacular for Clairol® and that he would pay 'anything' to get his hands on those old slide-show shots... the ones trashed a few months earlier.
Ever since then I have been loath to get rid of anything that might have even an iota of a chance of being useful. So the old Epson® 2200s were still in place and thank goodness for that because they saved the day on our most recent job.
Old Technology Saves the Day
When the phone rings at Vashon Island Imaging I never know what awaits me on the other end of the line. As word spreads about the wide range of services we provide, more 'unusual' jobs land on my desk. The challenge of some of these generates the excitement that makes life worth living for a giclée printer.
The challenge for any professional giclée printer is to balance reality with expectation. That is, what the client wants versus what can be delivered. The gap between the two generally widens in an inverse proportion to the client's understanding of digital imaging and PhotoShop®.
Many totally sane artists have been led to believe that they will be able to get great results all by themselves using 'prosumer' gear. Actually, they can if by 'great' you mean better than 10 years ago. But the results you get with an investment of a few hundred dollars and a few hours of PhotoShop® training isn't good enough for accurate color reproduction. That fact saddens many artists and photographers and leads some of them to our doorstep at Vashon Island Imaging.
Here we take on all sorts of projects from product shots and art copy work to prepress ...all the way through finished art and production. We can do that because I didn't throw out those old machines.
I still have and use many traditional photomechanical machines and procedures to produce the finest quality giclée prints. Those who follow this blog or who have read my book (available at www.gicleeprepress.com) are familiar with many of these 'old fashioned' ways and why they produce superior results to purely digital alternatives... at least from the aesthetic side. In the end, it's not what it says on the dial, it's what you see in the print.
Our latest project has been printing an installation-art piece called Severed Head for artist Monica Gripman. It turned out to be an appropriately named job because it took a 'disconnect' to get the look the artist wanted. (Installation art refers to large-sized pieces that are installed professionally rather than carried home from the gallery.)
on a large Plexiglas® sheet at Vashon Island Imaging.
Gripman's work is a collage like none I have seen before. At first clance the collage appears to be a disorganized stack of pictures. Then you realize that together they form another image, usually a sensual one.
Monica Gripman's style is 'Retro' and reminiscent of David Hockey's work with Polaroid® pictures. However she takes it to a new level utilizing more contemporary machines that are on on the leading edge of Retro. Her 'camera' is an old copy machine. Captures are output onto photo paper using an ancient old HP® printer.
Although she makes it look easy, many 'shots' are captured to get the pieces for her picture puzzles. 'I burn through a lot of material before I get the pictures right,' she explains. 'Severed Head uses 14 out of about 150 pictures.'
In the background I hear her partner Greg correct her noting the number was closer to 300. 'Whatever,' she continues, it costs us quite a bit to put one of these together even using the most economical materials.'
'Aha', I thought, 'the old 'bottom line''.
The bottom line is more important now than ever before, especially for artists who must invest their time and money with greater risk than most people can imagine.
Severed Head is no exception being a collage of 14 giclée prints mounted on a large sheet of Plexiglas® measuring 72 X 30 inches. It costs money to make a piece of work like that to say nothing of shipping it. This piece is destined for display in New York City and to ship it safely across the country a special container is being built. But I digress...
What drove Monica to our doorstep was the frustration of trying to make a set of copy prints with an Epson® R1900. Whoever sold her the printer should have his or her ink cut off because anyone who meets Monica knows at a glance that this gal is a Ludite.
Or is it just me?
I am considered a Ludite by some and a wizard to others. It's all relative, eh?
Don't get me wrong, Monica is one sharp cookie. She got all the gear they told her to, followed all the instructions, pushed all the right buttons, and got results. Unfortunately, those results indicated that she would have to learn more about printing... a lot more.
Anyone else might have been very satisfied with what the R1900 printed. However, Monica was trying to match the look of the ancient HP® printer and 'plain' photo paper.
The disconnect was that it was easier (and more accurate) to use old technology than to dumb down a modern machine in some kind of simulation. Sure, you can build a bunch of custom profiles, blah blah blah.... and while you are doing that I will print the job on my old machine and go out to lunch. So...
Being a sharp cookie, Monica decided that learning to be a master printer was not the best use of her time.
Catering to the Artist Mentality
Artists are demanding clients when it comes to printing. For some reason they expect that the colors in the reproduction will be like the ones in the original. Silly artists... What do they know about color management?
Monica explained the problem as she laid out the original prints made on the old HP and the copies of them made from scans and printed with the R1900. There was a world of difference between them, even though Monica had followed all the instructions.
 Comparison of prints made by Monica's old HP machine (right)
and her Epson® R1900 (left) shows visible differences easy to see
even in this tiny blog picture of them.
The HP® prints had been scanned to high quality TIFF files and those sent to the R1900 for output onto Epson® Premium Luster Paper. Most folks would have probably OK'd the copy prints and many might even have preferred them. The rich blacks produced by the R1900's pigment inks make those printed with the HP's older dye inks pale in comparison.
However, Monica went on to explain that she had already showed the originals to the gallery so the new prints had to match the old ones exactly. And why not use the originals? ...Because they had become marred by over-handling without adequate protection.
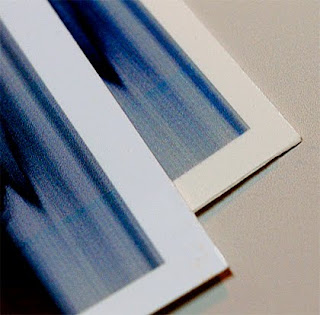
Matching the look of Monica's original prints was complicated by
differences in the white points of Costco's photo paper (left)
and Epson® Premium Luster (right) which is warmer.
Both have about the same brightness and reflectance, thankfully.
I explained to Monica why the copies could never exactly duplicate the originals unless they were printed by the same printer on the same paper. It didn't really help to know that, in her point of view. All she wanted was a solution... and that's where the old Epson® 2200s came in.
The HP® machine used to make the originals is much closer in age to an Epson® 2200 and both use old dye-based ink technology. The look produced by each is similar and different than the look produced by modern printing machines. So the 2200 was chosen for output of this series of prints.
The next challenge was to get the colors as close as possible to the originals. That is not as easy as it seems with an Epson® 2200 because the level of control with a $500 machine cannot be compared with a $5000 one.
Complicating things, the pictures in Severed Head have large areas requiring good dmax. However, the highlight details of the hair were marginally captured by the scanner and are even hard to see even in the originals. With any over-inking those 'highlights' would be obliterated. Needed was independent control over the dmax of the background and restoration of the hair highlights.
Restoration of Highlights
Restoration of the highlights is possible but requires a lot of work. It was therefore decided to concentrate on the highlights around the central point of interest, the face. Those were brought out of the shadows using the following procedure:
1.) The hair was 'Lasso'd' and copied onto a separate layer placed above first layer, in PhotoShop®.
2.) Levels were squeezes to create super-high-contrast rendition with the highlights clearly visible.
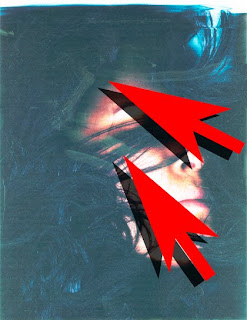 Squeezing the Levels produced a high-contrast version
revealing hair details as well as abrasion marks on the print surface
(indicated by red arrows).
3.) The layer was de-saturated to reduce the color build-up that occurs as contrast is increased (and with it saturation).
4.) The separation of highlights from dark tones was intensified using Brightness and Contrast.
 Look close and you can just see the hair highlights
made by the steps above as well as a whole lot of spotting and
cleaning to get rid of the dust, scratches and noise you always find
in any scanned image's dark tones.
5.) The highlight layer was placed on top and it's Blending Option was set for 'lighten'.
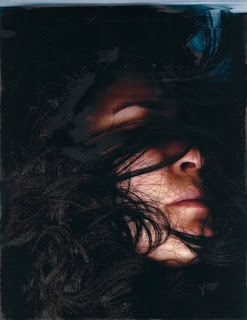 [Detail of] Severed Head © Monica Gripman 2010
The highlights layer fills the shadows of the picture layer beneath it.
Although the background of the highlight layer is black (see Step 4),
by setting the layer's Blending Options to 'Lighten' only the highlights are visible.
6.) The layer's Opacity was lowered until the blend was perfect.
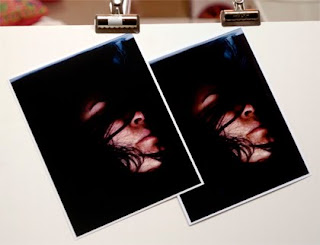 The finished print from the Epson® 2200 (left)
looks very close to the original (right) printed on an old HP machine.
What's perfect? Only a test print can tell you that. You can't see a faithful representation of these kinds of shadow details on a monitor. However, being able to control the intensity of the highlights with a simple adjustment of Opacity gives total control to this important visual element while printing.
Having the highlights (and shadows) on separate layers allows precise manipulation of the image to precisely control the amount of ink flowing to each pixel.
Photography Beats Scanning
The mark of a good print is being able to see into the shadows and highlights. The more details the higher the quality.
I explained to Monica that in the future her work would print better if the originals were photographed rather than scanned.
Traditional photomechanical methods are the only way to get consistency from one capture to the next. Consistency is coin of the land in the realm of collage... at least for giclée printers. A collage is like a side-by-side comparison on steroids. Without consistency, you'll never make any money. Imagine all the pieces of a jigsaw puzzle having different looks!
Who's Flying the Plane?
Do you think these jets are flying on autopilot?
Scanners use algorithms that analyze images and calculate the 'right' levels, curves and colors. It will do its best to capture the entire dynamic tone range of any picture put in front of it. But it can't, for two reasons:1.) The dynamic tone range of the picture being scanned probably exceeds the exposure limits of the capture device's sensors
2.) Digital capture devices are set for mid-range 'average' tones. They are easily thrown off by too much of any color, but especially lights and darks. For example, small patches of tone on large black or white fields are tough for auto anything.
Although scanners have image control settings, that is not the problem. You can dial away until you get the first one just right. Then comes the real problem.
Consistently Inconsistent
Consistency from one scan to the next is the problem. There isn't any.
Trying to make all of Monica's 14 scans look alike with the kind of precision she likes would be a daunting task with or without auto pilot. Think about the total number of adjustments that were made by the scanner, then make a permutation of that number. The result is the number of possible combinations you might have to go through for each and every one of the 14 scans.
Well, no thank you. While your doing it the digital way I'll photograph all 14 originals and go work out... or maybe I'll go fishing... I'll bring my cell phone... you can call.
Fortunately Severed Head is supposed to have (ever-so-slightly) inconsistent color from print to print, so that was a 'break' for us.
The 'heads up' of this story is don't be too quick to sever the connections with old machines. What better way to recreate the Retro look than with retro tools and techniques? And how many times a year do folks come into your studio asking for the Retro look? Do the math and it'll be back to the future for you too.
To speed you on your way, learn more about photomechanical production techniques for giclée printing in my book, Giclée Prepress - The Art of Giclée. Pixel-perfect printing in thirteen steps. Read a sample at www.gicleeprepress.com.
Coming Attractions
See more of Monica Gripman's work soon right here. We can't show you the finished piece, Severed Head, until green-lighted by her gallery ... so re-connect with us soon to see it!
Next blog features the capture and printing of Monica's most recent encaustic artwork made as a preview for an installation piece entitled Mexican Indian.





Can't wait to see the finished piece
ReplyDeleteLike the imagery and the idea...
ReplyDelete