

How to Restore Damage from Rust Stains
We get some odd jobs at Vashon Island Imaging, but this one 'tops' them all... restoring an old milk bottle cap.
 An original Lande® Dairy bottle cap was discovered in the attic.
Years of contact with a rusting staple had badly stained it
and the printing ink was flaking off the deteriorating paper
due to thermal cycles and humidity in the attic.
Katrina Lande came to us with the newly discovered family treasure because we have a reputation for good restoration work. She explained how her ancestors ran Vashon Island's biggest and best dairy. 'They had electric milking machines,' she proudly explained to me. But that was a long time ago.
Since then the bottle cap had lain in the attic slowly disintegrating along with everything else up there. Katrina was rightfully concerned about its preservation, now that it had been found. I recommended two things:
1.) First, capture and restore an image of the cap. Then...
2.) Preserve the original in a sandwich of acid-free paper in a light-box with low humidity. A darkroom paper box is a perfect container... but don't put it back in the attic. Keep it where you live... turns out that things being preserved like many of the same creature comforts we do.
At my studio the most important treasures of my past live in the same rooms I do. It's something I've been doing for the last ten years after I discovered for myself the dangers of storage in less than perfect conditions. Now I consider my past mistakes as some sort of 'natural selection' process for my art. However, the extreme damages to once beautiful pictures were a tough way to learn about archiving.
 Our digitally restored version
of the Lande-family's (and Vashon Island's)
historical treasure.
Easy As One-Two-Three
The restoration work on the Lande® bottle cap was straightforward and provides an easy-to-understand model with which to consider more complex restoration jobs. It is a three step process in PhotoShop® using a digital image of the bottle cap (we made ours using a Nikon® D2X) on a copy stand).
1.) Isolate key graphic components on separate layers
2.) Create a new background (BG)
3.) Prepress each element according to its needs
Finished yet?
OK, there's more to it than that, but not much. Here's the procedure used in this particular case:
 Each graphic element to be restored is placed on its own layer. 1.) Red type (Pasteurized) (right) , 2.) Green (Logo triangle graphic), 3.) Paper piece construction (center)
The starting point is to take the picture apart according to the elements that need to be repaired. Cutting them out of the background and pasting them onto their own layers separates those elements for restoration.
The cutting Paths are made using the pen tool working at a zoom of 500% to 800% (on a 22-inch monitor).
A completed path is converted into a Selection (Path / Make Selection).
The selection is expanded (or contracted) 1 pixel to include a bit more of the item being isolated. Large cutouts require 2 pixel or maybe 3 if they are really big... you just don't want a hard edge or an overly soft one.
Feather the selection by 1/2 pixel.
Copy and paste the selected part of the picture onto another layer.
And so it goes until everything that needs work has been isolated on separate layers. Once the separations have been made, each can be independently repaired.
Remaking the Graphics
 Restoration of the graphics began with the Red type. Using the original (saved) selection previously made (above), that selection was filled with red on yet another layer. The red color was determined by sampling the original type in an undamaged area. I actually sampled three areas and averaged them to get a composite shade of red.
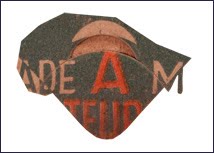
Then the same thing was done for the Triangle, filling it with green.

Odd shaped piece of new paper
assembled from bits and pieces of
the original.
Making a new paper background was the next step.
Between the printing and damage there wasn't much clean BG paper left in the original bottle cap. Carefully cutting out bits and pieces and collating them together into a collage, a useable sized piece of 'new' paper was crafted onto its own layer. That layer was duplicated thrice and those bits flipped and flopped to create four pieces that could be kluged together into another, even bigger chuck. Etcetera.
The new paper was used two ways. First, to cover the damaged old paper. Also to provide texture for the type and triangle patches. Those graphics were filled with solid colors when we left off (above). The solid colors don't look realistic because they lack the texture of the paper.
Paper Texture
To make paper texture copy the new paper layer and use Brightness & Contrast to generate a high-contrast version... it should have black and gray flecks against a mostly white BG.
 High-Contrast version of new paper piece serves as a paper texture mask.
Set the Blending Options for that layer to Darken. Now, you can put that layer on top of any other and by setting the Blending Options to Darken add a facsimile of paper texture. Thus, texture was added to the red type and green triangle to provide more realism.
Layer Blending for Nuances
When restoration work involves completely remaking certain elements, blend a bit of the original back in to the extent you can wherever you can. The new paper BG just discussed provides a good example.
It's easy to see that the rust-stain damage has darkened the paper of the original bottle cap.
Yes, you can replace the whole BG with new paper, but that's not as realistic as blending in the new paper only where the old needs replacement, and only to the extent needed.
Do precisely that by first placing the new paper layer over the original damaged version, then setting the new-paper layer's Blending Options to Lighten. Presto, the rust damage is gone.
Fine-tune everything with judicious use of the Eraser. By adjusting the opacity, softness and size of the Eraser the blend will be perfected.
Lastly, use the Sponge to adjust the saturation of key spots if need be. Remember that the Sponge can also have its opacity and effect dialed for precision adjustments.
 The original red type(above) is placed over
the solid-red-fill type and the extremely damaged
part erased away (lower center).
The same technique was done for the Red type and for the green triangle, except that the Blending Option was set for Darken.
Recompose for Final Prepress
Gather all the layers together into a Group.
Copy the Group and Merge it.
Use the Merged layer as a Sub-Master for further work, which will be the normal range of prepress adjustments. What are those?
Prepress adjustments are described in full in my book, Giclée Prepress - The Art of Giclée, which you can proofread at www.gicleeprepress.com. They are also described, as individual case histories, in this blog ... like this story. (If there's something you'd like to learn about, let me know.)
Both my book and blog are about the 'Zen of Giclée'... restorations of your faith as well as your pictures, no matter how old they (or you) are.
Having milked that pun for what its worth, I'll leave it at that and cap this blog.


Did you know that you can create short links with AdFly and receive dollars for every visitor to your shortened links.
ReplyDelete